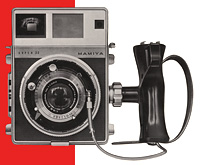
Mamiya Press Super 23
Users Guide
Pull out stabilizing plate (#31) at bottom of the camera body when resting the camera on a desk, table, or other surface.

Before attaching either the focusing screen holder or roll film holder, turn both lock knobs (#28) to align their flattened sides horizontally, then remove plate on rear of the camera body. Insert upper edge of the holder into upper groove of camera body, and press down the lower side of the holder. Fasten the holder by turning both lock knobs (#28) 90 degrees.
To detach the holder, turn both lock knobs to align their flattened sides horizontally, then pull out bottom of the holder.
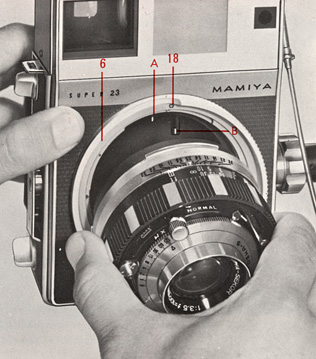
When mounting the lens, turn bayonet ring until the red mark (#18) on the ring is at the top, insert the lens matching the red mark on the lens to the red mark on bayonet ring; then turn the bayonet ring clockwise, locking the lens in place. When dismounting the lens, hold the camera and rotate the bayonet ring (#6) counterclockwise, as seen from the front, until it stops; then remove the lens.
Pins inside the camera body, (A) and (B), are used as coupling pins for the rangefinder and the lens barrel retraction warning signal. Do not tamper with these delicately adjusted pins which represent important parts.
Be sure to insert a dark slide into the holder, if the lens is changed while a loaded holder is attached to the camera.
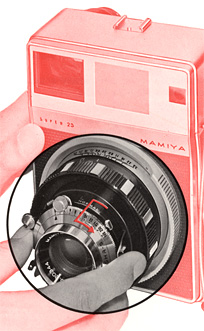
When using a 100 mm f/3.5 standard lens, the lens-shutter assembly must be pulled out from its retracted position before taking normal photographs. Grip the lens-shutter assembly firmly, turn it slightly counterclockwise, and pull it out; then, turn it clockwise as the direction of arrow on top of lens barrel indicates.
If the lens-shutter assembly is left in its retracted position, the coupled rangefinder will not function even if the two images are coincided and form a single image.
To prevent inadvertent photography with the lens retracted, a red warning mark (W) appears in center of the viewfinder while the lens is in its retracted position.
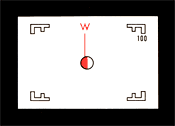
As the lens is focused to a distance of 6 feet (2 meters) or closer, the red warning signal will disappear, and although the two rangefinder images will coincide, the picture will still be out of focus.
Retraction is necessary when the use of swinging and tilting back is desired, for photographing distant subjects.
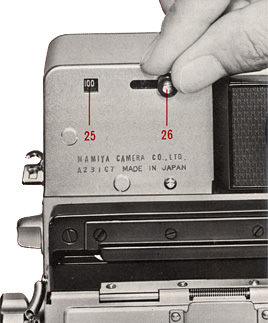
The brilliant frame in the viewfinder can be slid over to 100 mm, 150 mm, and 250 mm lenses. Move the viewfinder field frame button (#26) on rear of the camera body so that the window (#25) shows the figure coinciding with focal length of the lens being used.
When using the 50 mm or 65 mm wide angle lens, attach the separate viewfinder to accessory shoe of the camera.
Customers who possess a former finder with the 65 mm lens for the Mamiya Press can use it as is.
In case, a former type finder is installed on this camera, the parallax due to installation location of the finder fall within approximately 9/16 in. (15 mm) from top-to-bottom and from right-to-left respectively for dimensions of the object to be brought into focus. Consequently, this poses no problem in normal photographing procedures; however, to eliminate this parallax, a separate finder adapter is provided.